Gluten-Free Pulled Pork

Dry-Rubbed Pulled Pork and Barbecue Sauce

I love love love pulled pork, but don’t have a real BBQ pit in the yard.  Instead, I take a shortcut of popping my pork in a crockpot, which still gets you a slow-cooked, braised pork without a lot of mess.

Dry Rub ingredients

  • 1/4 c. brown sugar, loosely packed
  • 2 tbsp chili powder
  • 1 tbsp cumin
  • 1 tbsp paprika
  • 2 tsp ground pepper
  • 1 tsp cayenne pepper
  • 1 tsp dry mustard
  • 1 tsp salt

Mix the ingredients together.  Trim off most of the excess fat from a pork shoulder roast (I used a Boston butt that was just over 4 lbs).  Place the rub on the top of the roast and sides, then flip over and place the rest on bottom of the roast. Ideally it is best to place the rub on the roast the night before you cook it.

The next morning place the roast in a large crockpot.  Pour 1/4 cup white or apple cider vinegar and 1/2 of dry ginger ale into the crock pot.  Cook on high for one hour and then turn down to low and cook for at least 4-5 more hours, depending on the size of the meat.  Because it is in a crock pot, and tends to be fairly fatty cut of meat, you can let it go a fair amount before it will become dry.

The meat is done when it flakes off when touched with a fork.

Gluten-Free Pulled PorkRemove the meat from the crock pot and let rest for 20 minutes.  Then pull the meat into shreds with two forks.

You can serve on a GF bun or with mac and cheese, cole slaw or other traditional BBQ accompaniments, including, of course, BBQ sauce.

Pulled Porked BBQ with Gluten-Free Macaroni and Cheese

Pulled Pork BBQ with Gluten-Free Macaroni and Cheese

As an experiment.  I made a Memphis style, whereas last time I made a mustard sauce.  It was good, but not quite what I wanted. If you’re buying, Pork Barrel makes a nice smoky BBQ that’s GF, or I also like Sweet Baby Ray’s.

gluten-free Memphis style barbecue sauce

Memphis Style BBQ Sauce

gluten-free Memphis style barbecue sauceBBQ and other sauces can often be “stealth” sources of gluten, so if you make your own, you can be assured it’s gluten-free.  Plus this is delicious.

This makes about 3 cups, more than enough for your average pulled pork shoulder and some extra besides.  It will keep for several weeks in the fridge or longer if you bottle it and store it properly.

This is adapted from Steven Raichlen’s Barbecue! Bible Sauces Rubs and Marinades book.  It’s a great book that gives you background on the way the ingredients in BBQ sauces and rubs work.  I highly recommend it.

With the meat, this sauce has just about the right amount of kick, and will mellow out a bit as it cools than when you first put it together.

Wet Ingredients

  • 2 cups tomato sauce
  • 1/2 c. apple cider vinegar
  • 1/2 c. Pepsi or other cola
  • 2 tbsp yellow or brown mustard
  • 2 tbsp lemon juice (1 average lemon should do it)
  • 2 tbsp Worcestershire Sauce
  • 2 tbsp teriyaki sauce (Note that teriyaki and soy sauce can be a hidden source of gluten, so make sure yours is GF by checking the allergen/ingredient list or make sure it’s labeled GF. (Kikoman now makes a GF Teriyaki and La Choy has a GF soy sauce).
  • 1 1/2 tbsp soy sauce (ditto as above for the teriyaki on the stealth gluten)
  • 1 tbsp molasses
  • 1/2 tsp Tabasco sauce
  • 1/4 tsp liquid smoke (optional)

Dry Ingredients

  • 1/4 c. brown sugar, loosely packed
  • 1 tbsp chili powder
  • 1/2 tbsp ground black pepper
  • 1/2 tbsp dry mustard
  • 1/2 tbsp paprika
  • 1 1/2 tsp garlic powder
  • 1/2 tsp dried onion or shallot
  • 1/4 tsp cayenne pepper
  • 1/8 tsp celery seed
  • 1/8 tsp salt (optional)

Note: I did not add much salt as almost all of the sauce ingredients already have a fair amount of sodium by their nature.

Directions:

Gluten-Free Memphis BBQ sauce on the stove

Ancient Le Creuset to the rescue

Mix the dry ingredients together.

Place the wet ingredients in a stainless steel or enamel pan (I used my Le Creuset saucepan that I inherited from my mother-in-law, who got it as a wedding gift so it’s older than I am.  It has a lovely pour spout that is very convenient for pouring the sauce after cooking.)  Bring the liquid ingredients to a boil over medium high heat.  Stir for a minute or so and then add the dry ingredients and mix.  Simmer over low heat for 20-30 minutes until the sauce thickens up and is reduced by a quarter or so.   Let cool, pour into containers for serving and storage. It will keep in the refrigerator for several weeks at least. IMG_20150726_125143

I served it with pulled pork. You can dip or just throw some on and mix it up.  Super yum!

Gluten-Free Raspberry Oatmeal Coconut Bars

Both hubby and I are tea drinkers, and were delighted to discover a tea shop in Brattleboro, VT, where we go every few years for the annual Strolling of the Heifers, a major dairy and slow food festival that’s held on the first Saturday of June.  We stumbled onto a placed called the Twilight Tea Lounge (now closed, sadly) that had  hundreds of tea options and most importantly for hubby, GF options. He was thrilled the first time we were there to eat a yummy raspberry bar.

This is something I created based on those bars.

Raspberry Coconut Oatmeal bars Ingredients

For the bottom

  • 1 1/2 c. GF baking mix (I used Bob’s 1-to-1)
  • 1 1/2 c. oatmeal (preferably coarse ground Irish or regular, not quick)
  • 1/2 c softened butter
  • 1 egg, beaten
  • 2/3 c brown sugar
  • 1/8 granulated sugar
  • Dash of salt

For the top

  • 3/4 c toasted coconut flakes
  • 1/2 c GF flour/baking mix
  • 3/4 c oatmeal
  • 1/3 c. brown sugar
  • 3-4 tbsps softened butter

In the center

  • 1 1/2 c. raspberry preserves or jam

IMG_20150722_161538

Toast the coconut lightly.   Meanwhile combine the dry ingredients for the bottom in a large mixing bowl , and mix –  add the egg and the melted butter and mix until moistened.

Press the mixture into the bottom of a 13×9 pan.  Place in a 350 F oven for 10 minutes until it browns a bit on the top.

Remove and cover with the jam or preserves.  Raspberry Coconut Oatmeal Bars

Mix together the remaining ingredients, dry ingredients first and sprinkle over the top.  Place in oven and cook for an additional 20-25 minutes until golden brown on the top and the jelly is bubbling.

Raspberry Preserves

IMG_20150722_173610
You can use jam or make your own if you can get some fresh raspberries.  Since mid-July is primo berry season, I decided to try my hand at making my own.

  • 2 -4 cups Raspberries, washed and either chopped or put through a food mill.
  • 1-2 c sugar
  • 2-3 tbsps of lemon juice
  • bit of salt
  • 1/3 c of water

Put the berries in a pot over medium – high heat.  Add the water, sugar, and lemon juice and cook until it starts to thicken.  If you want it very thick, you can add cornstartch (dissolve it first or you’ll get lumps) or pectin, which is trickier to use.

This should take about 5 minutes.  When it stops dripping off the spoon and is thick enough to coat the back, it’s done.

Don’t let it boil too high or it will scorch the sugar.

Note: if you get too much water, it will be too runny, but never fear, you can always put in a bit of corn starch dissolved in warm water to thicken it. Make sure it boils after you add the corn starch or it won’t do its job.

You can try to remove some of the seed with the mill afterwards but they don’t bother me so I just leave them in.

Gluten Free Heaven – Against the Grain Factory Store

Exterior of the Against the Grain Factory Store in Brattleboro, VT

Against the Grain Factory Store

It has been over 90 degrees here the last few days, which makes me a little reluctant to spend a lot of time in the kitchen. (Like most New England homes, especially ones that are 125 years old, ours does not have built-in AC. Even with window units, it’s still pretty toasty.)

Instead I’m posting about a fun GF-related outing we just had. Hubby and I just spent a lovely weekend in Vermont. We were planning on doing some hiking and kayaking, but ended up having a lot more sedate trip because I fell and broke a rib last weekend. (Ouch!) So definitely NO kayaking, and sadly for Hubby, not even much fun driving the little back roads as we might as otherwise had since my bruised ribs and the car seat were not getting along very well.

Our first stop in Vermont was the Against the Grain factory store, which is located in their production facility in Brattleboro, Vermont.  If you are not familiar with Against the Grain products, they are really good, especially the GF French baguettes.  We’ve met the owner briefly a couple of times now at another Vermont event, the Strolling of the Heifers. Unfortunately, they don’t have a factory tour, (hint, hint) but they do have free and discounted ATG items, and given the price of gluten-free foods, it was well worth it.  They also have samples, cookbooks and some GF merchandise (including their tongue-in-cheek “#gfyourself” t-shirts.)  The GF, Vegan cookies were excellent. (I’m a big dairy fan, and usually not so into the vegan, so if I say something vegan is good, it’s pretty good).

We could only buy what we could eat in the next few days, since we didn’t have access to a freezer.  But we did get some super yummy rolls and baguettes. No, the texture and taste of an Against the Grain baguette is not quite the same as a “real” wheat baguette, but believe me, if you haven’t had one, they are worth getting.  It is both by light years the closest we have found, but also stands on its own.  It doesn’t need to compete to be “real.”  This is one of the products that passes the test of – I eat because I want to, since I don’t have to eat GF. They just had the plain baguettes as seconds, which is yummy, although the rosemary version is even better, I think.

Nancy Cain, the founder, doesn’t like using gums as binders and so for this bread basically uses cheese as the binder. Generally ATG products use lighter flours (tapioca, etc.) The result is a loaf that is light (yes, a gluten-free product that is light without being tasteless!) and airy, has a good chew factor (not as crunchy as with wheat), and is very tasty.  It’s sort of like a cross between standard French bread and a cream puff shell. Along with tasting good, the company tries to do good with its business practices, using as much green energy as possible and paying a starting wage of $15 a hour for all workers. She has a new cookbook out, which I bought and will be trying recipes from so you will hear a lot more about that.

Picnic Spot under the Dummerston Covered Bridge

Is this a gorgeous picnic spot or what?

We had brought ham, cheese, tomatoes, berries and drinks with us.  Now with the bread, we had all the elements for a spectacular picnic.  We ate along the West River in Dummerston, just under one of Vermont’s many covered bridges. I gingerly descended the steps to the river and we were definitely rewarded for the effort because it was a gorgeous spot and we had a wonderful picnic, watching the rapids and little kids (and some grownups) jump around in the water.

PS. If you do go to Against the Grain, the store is quite hard to find, so don’t give up.  You turn in from Rt. 5 just before the Agway.  There’s a set of industrial buildings just to the back of it, and you need to go in there and follow around the edge of the building all the way to the other side.  (There is a very, very tiny sign). Alternatively, you can go around the front of the Agway and back around on that side.

Roast chicken on bed of rice and sausage

Gluten-Free Cornbread

For this cornbread I use a mixture of flours.  For gluten-free baking, it can be difficult to get the right flour mixture.  I do recommend Bob’s Redmill flours. I used Bob’s 1 to 1 mix, plus a little fava bean and some buckwheat (which despite its name contains no wheat and no gluten).

When choosing flours, you can either choose a flour and add xantham or guar gum, which add the stretchy bit that is usually contributed by gluten, or choose a baking mix, which generally includes gum already.  You can skip the xantham gum, which is kind of bitter and smelly, but just be aware that whatever you’re making will be a little more crumbly.  You can address some of this with a bit more liquid or fat, and can more easily get away without it in heavier foods (think pound cake) than lighter ones (think biscuit).

Ingredients

  • 1 cup GF baking mix or flour
  • 1 cup yellow cornmeal
  • 1/4 cup sugar
  • 1 tbsp baking powder
  • 1/2 tsp salt
  • 1/4 cup vegetable oil
  • 1 tbsp butter, melted
  • 1 egg, beaten until fluffy (you can also use 2 egg whites)

Preheat oven to 400 degrees F. (205 C)

Grease and flour a 8×8 or 9×9 inch glass pan.  If you like you can add a piece of waxed paper, which makes removal a lot easier.

Mix dry ingredients. Stir in the milk, eggs, oil and butter, until just moistened.  Pour into pan.  Bake 20-25 minutes until lightly browned on top, it springs back when lightly touched and a toothpick inserted in the center comes out clean.

Rosemary Roasted Free-Range Chicken on a bed of Rice & Sausage

Rosemary Roasted Chicken on a bed of Rice and Sausage with Gluten-Free Cornbread

Roast chicken on bed of rice and sausage

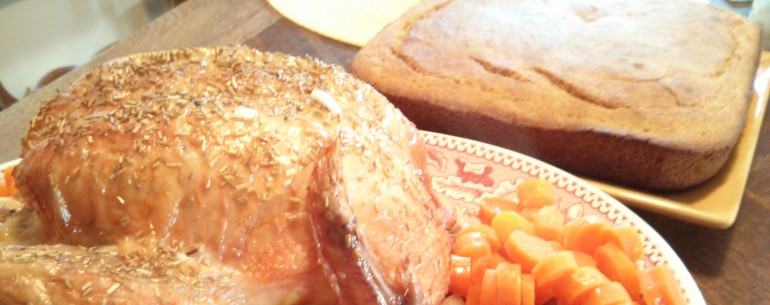
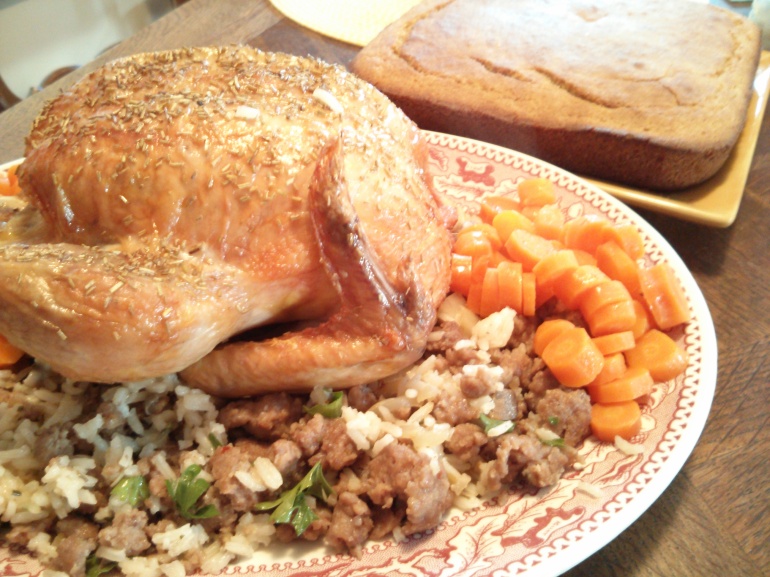
Gluten-Free Roasted Chicken on its bed of rice and sausage dressing.

Our town has recently opened a Farmer’s Market, which we were both delighted about and anxious to support.

On its inaugural day, I got off the bus in the town center, anxious to see the goods, and got a little giddy over the fresh hand-picked strawberries and other veggies.

(Side note: if you have not had fresh local strawberries rather than those overgrown, rather hard imitators that bounced across the country from California, you don’t know what a strawberry is supposed to taste like. These were as they should be, smallish, deep crimson red, tender without being soft, and very juicy.  A friend of ours that lives about three blocks from the town common where the market is bought a quart. Her three boys had eaten the entire quart before they reached the house. They taste gold-plated and unfortunately have a price to match, but it was worth it anyway.)

The second week of the Farmer’s Market bought even more bounty from a new booth where you can get pork and chicken products.  I succumbed to both a free-range whole chicken and some homemade hot sausage (still uncased).

I rarely buy whole chickens, so wasn’t entirely sure what I was going to do with the lot, but came up with this as a  solution.

The chicken I simply roasted, and essentially made a stuffing/dressing to put the chicken on out of veggies, sausage and rice.  We served it with some buttered carrots (also from the farmer’s market), and fresh cornbread. Directions and recipes follow.


Roasted Free-Range Rosemary Chicken

Before placing it in the oven, rinse the chicken in water and pat it dry with a paper towel.

Rosemary Roasted Free-Range Chicken

Rosemary Roasted Chicken

Rub with olive oil (lighter and less prone to burn than butter) and spices.  We do have Rosemary fresh in our garden this time of year, and I used some fresh for the dressing, but for the roasted chicken simply sprinkled on dry. Just shake until it looks right. I just used Rosemary to keep the flavor simple. Another nice addition might be to rub the chicken skin with garlic before putting on the olive oil.

Place in a dutch oven or shallow roasting pan, and pin or tie the wings to the body.  Roast uncovered at 375 (or 400 if the bird is under 2 1/2 pounds (190 or 205 degrees C).  A small bird (2.5 pounds) will take about 1 – 1 1/4 hours unstuffed. A 3-4 pound bird can take 2 hours. Stuffed birds will take 15-30 minutes longer.

Once the chicken is cooked to a safe temperature (175 degrees F, 80 C), let it set 15-20 minutes before carving.  Since mine was free-range, the usual ability to tell whether a bird is done by wiggling its leg doesn’t work here.  Make sure you use a meat thermometer.

I had another problem with the leg as you can see from the photo. When I got the bird at the Farmer’s Market,  I popped it in my bag quickly, and didn’t notice until I took it out to cook it that it was missing a leg!

Foghorn Leghorn on crutches

I’ve got my bandages to keep me warm.

Apparently it came off in processing, but when I saw it I couldn’t get rid of a vision of a poor chicken hobbling around the barnyard with a crutch under one wing. Shades of Foghorn Leghorn.

Serve on a bed of dressing.


Sausage and Rice Dressing

For the dressing, I just made it up as I went along but the ingredients were roughly as follows.

  • 1 pound sausage (hot or sweet, depending on your preference)
  • 1 1/2 cups rice (dry)
  • 1 small onion
  • 1 celery stick
  • 4 oz mushrooms
  • 2 cups chicken broth
  • 1 cup water
  • Fresh Rosemary to taste, removed from the stem
  • Fresh Parsley to taste, chopped or snipped

Combine the rice, the chicken broth and water in a saucepan and cook until done.

While that is simmering, cook the sausage in a heavy fry pan until no longer pink.

Wash and chop the vegetables in the meantime.  I cut the onions and celery very small, and sliced and chopped the mushrooms fine as well. Once the sausage is done, remove the sausage to a bowl, temporarily, and remove some of the fat, and cook the vegetables in the remaining fat until the onion is tender and translucent and the celery softens. Once the veggies, rice and sausage are all cooked, mix them together and snip fresh rosemary and parsley over the top to taste and mix in.  I used 2-3 springs of rosemary and  what would be equal to 2-3 tablespoons of parsley.  You can add a bit of salt, if desired.

Spread on a platter and place the chicken on top.  It should look and taste delicious.  We served it with hot buttered carrots and cornbread.
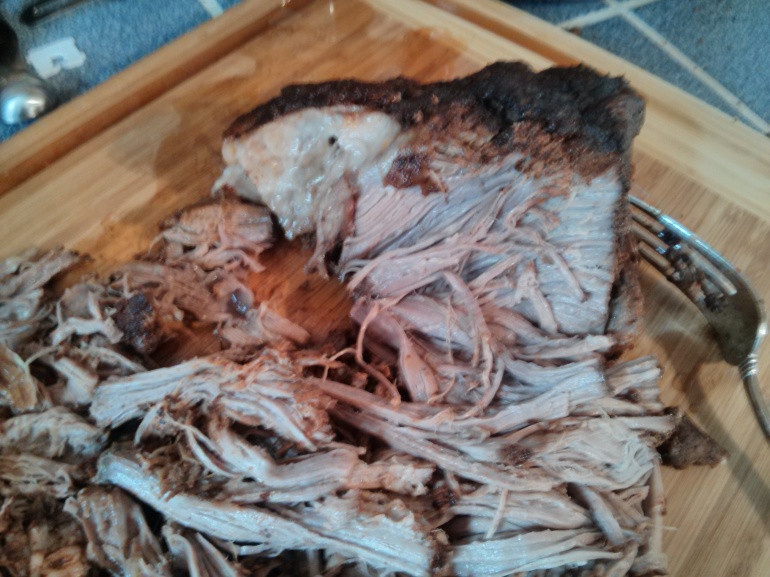
Gluten-Free Braised Short Ribs

Gluten-free Braised Short Ribs

Ribs so tender they almost cry

 This is the second time Hubby and I have tried this recipe.  It makes a fantastically tender and flavorful dish.  The ribs just melt under your fork and in your mouth.  We paired them this time with carrots and mashed potatoes, both of which are also delish with the vegetable sauce. 

  • 2 pounds of short ribs (boneless)
  • Two celery sticks
  • Two carrots
  • Half an onion
  • 1 teaspoon of thyme
  • 1 cup of bold Red wine 
  • 1 cup Beef low sodium broth
  • 1 small can of low/no sodium tomato sauce
  • Tablespoon of fresh parsley
  • Quarter cup of gluten-free flour (you can use a GF baking mix, or rice or potato starch flour) 
  • Pepper to taste (probably a tablespoon)
  • 4-6 garlic cloves
  • 2-3 tbsps of olive oil

Trim the fat from the meat and dust the ribs in flour and pepper.(I just grate in pepper to the flour until it looks like enough, but I suspect it is probably a teaspoon at least). Set aside.  Grate the veggies and simmer with wine, broth & herbs in a fry or sauce pan. Press or crush the garlic and brown the meat with the garlic and oil in a Dutch oven.   When brown, add  the sauce on top of the browned meat.  Cover and cook in oven at 325 for 3 hours, stirring  and turning the meat occasionally.  After the first couple of hours you may want to remove the cover to let the sauce reduce more. If the sauce boils too much, reduce heat. 

 Notes and options:

 The sauce simmers down significantly and can get salty which is why low sodium ingredients are used.   Adjust the liquids for the amount of sauce you would like.  With the veggies, it does thicken up.

We’ve made this twice now, once with boned short ribs and once without.  The boned ribs create a much fattier sauce, so use boneless ribs, if at all possible.  If you can’t get short ribs, you could also use a roast cut and slice it into rib-size strips (about 2 1/2 to 3 inches wide).

Gluten-Free Sausage Stuffing

Thanksgiving is my absolute favorite holiday, bar none.  I love it.  No overblown gifts and cards to buy. No nauseating sentiment.  Just feasting with family and friends, and taking time to be grateful that we can give thanks. 

Plus you get the Macy’s parade, which I absolutely adore despite its goofiness.

I also adore Thanksgiving food.  I was born and raised in New England so my family celebrates a very traditional turkey feast with mashed potatoes, gravy, stuffing, carrots, peas, onions, turnip, parsnips, squash, cranberry sauce, yeast rolls and a few other things I’m likely forgetting. 

Then there’s pie.  Pumpkin and Apple, of course, (with real whipped cream and vanilla ice cream), but we also often get chocolate (not so traditional), pecan, cheesecake and host of other things such as Indian pudding (a custardy mix of pumpkin, corn meal, raisins and molasses).  Lastly there is the rather odd concoction of pineapples,whipped cream, and pistachio jello mix made by my grandmother (still! at 96!) It’s commonly known as ‘that green stuff.’  It tastes a LOT better than that sounds, really.

I probably consume about 3000 calories, easy.  But I don’t care.  It’s totally worth it. 

Added to this  childhood feast is an additional stuffing recipe invented by my husband and here converted from life pre-gluten-free.  This has been a favorite for the better part of 15 years, and Hubby really missed it, as did our friends.  Believe me, this is a crowd pleaser.  You will never know it’s GF and neither will any of your guests.  They will still gobble it down.  How do I know this? 

It’s been road tested at both family Thanksgivings, where there is usually barely any crumbs left, along with multiple times at our holiday Thanksgiving with friends, with similar results.  Among these friends are some of the pickiest eaters known to man, so believe me, if they eat it, it’s good.  Part of our secret is we don’t bother to tell people it’s gluten-free, and no one can tell the difference. 

  • 1 1/4 loaves of gluten-bread (We use Food For Life Brown Rice Bread, which is the best sandwich-toasting bread.  Note that it’s denser than your average wheat bread).
  • 1 package (six short links) hot Italian sausage
  • 2-3 ribs of celery and leaves, chopped
  • 1 medium onion, chopped
  • 4-6 cloves of garlic, chopped or pressed
  • 4-6 oz of mushrooms, chopped
  • 3-4 tablespoons olive oil
  • 1-2 tbsps poultry seasoning
  • 2 tsps rosemary
  • 2 tsps thyme
  • 1/4 cup fresh parsley, chopped
  • 1 16 oz package chicken broth, low sodium, if possible

Cut up the gluten-free bread into small cubes about 1/4 to 1/3rd of an inch.  Toss with herbs and a tablespoon or so of oil.  Keep the crumbs and toast them too! Spread the bread cubes and crumbs out on a cookie sheet and toast for 10 to 15 minutes to dry out the bread slightly and crisp it up.  You can do this step a day or two in advance, if you want. 

While the bread is toasting, cook the sausage.  Remove the skin and crumble or chop in 1/3 inch cubes. 

Saute the vegetables and remaining spices in olive oil until soft, the onions are translucent, and the mushrooms are reduced. 

In a large bowl, mix the cubes and the chicken broth to re-hydrate the cubes.  Don’t dump it all in at once.  Depending on how big your loaf is, you may want a little more or less.  Also, if you want a slightly lighter mix, you can use some water instead.  Fold in the sausage and the vegetables (which will add some moisture).  If desired, put in more spices to taste.

You can use the stuffing inside the turkey or cook in a pan on the side (in which case it officially becomes dressing, although I never call it anything except stuffing).  For the latter, cover with foil for to keep the pan from drying out too much. About 15 minutes before you take it out of the oven, remove the foil.

Cook in a 325 F degree oven for an hour.  We usually cook it alongside with the turkey.  Enjoy.  This stuff is fab.