GF Bread cooked in a Dutch Oven

Crispy, Crusty GF Bread in a Dutch Oven – Adventures in Snow Day Baking

GF Bread cooked in a Dutch Oven

A snow day is the perfect time for something that takes a long time to cook. Unfortunately, I got a bit of a late start (shoveling had to be done, after all) so the process of both my slow-cooked corn beef

and for the bread described here were more rushed than I would have liked.

GF Bread — with an actual decent crust!

I got the idea for crusty GF bread from the King Arthur Flour blog.  The essential idea is that you cook bread in a preheated dutch oven.  This keeps in some steam and makes a nice crisp crust on the outside.  I used a standard  no-knead bread recipe and tried to make it GF as I went along, with fairly good results but not what I would describe as complete success.  I don’t usually make bread so not having used the recipe and knowing what it should be doing when it’s not GF made it more of an adventure.

Ingredients:

  • 2 1/2 – 3 cups warm (not hot) water
  • 4 1/2 cups GF “Featherlite” flour mix (this is a mix of lighter flours originally devised by Bette Hagman aka The Gluten Free Gourmet)
  • 1 c. buckwheat
  • 1 c. bean or standard GF baking mix
  • 1 1/2 tbsps active-dry yeast (next time, I’m using 2 tbsps)
  • 1 egg or egg white, beaten throughly, ideally to a froth or peaks
  • 1 tbsp baking powder
  • 1 tbsp salt
  • cornmeal and cooking spray for the pot

Directions

  1. Combine all of the ingredients in a large mixing bowl.  You want warm (not hot) water — think giving a baby a bath, not making tea.  Do not use cold as it has to activate the yeast.  
  2. Stir everything together thoroughly to make a dough. It will be very sticky.  If you have  beater or bread hook you can use that for 30-60 seconds or just mix by hand.
  3. Let the dough rise in a warm spot at room temperature for 2 – 2 1/2 hours. It should get quite big.   
  4. Refrigerate it for at least 2 hours.  Apparently you can leave it at this stage for up to 7 days and it will get tangier, like a sourdough.   I barely had time for the two hours, but next time will leave it longer.
  5. About 1 /2 to 2 hours before you want your bread, prepare a silicon mat, parchment (lightly greased) or floured cloth (cornmeal works well for this).  Plop the dough on it and round it into a ball (at least it’s supposed to be a ball, mine kept sinking flatter.)  You can sift a light coat of GF flour to help keep it moist.  Try to handle it as little as possible to avoid knocking out the air bubbles. 

    Bread dough on silicon mat

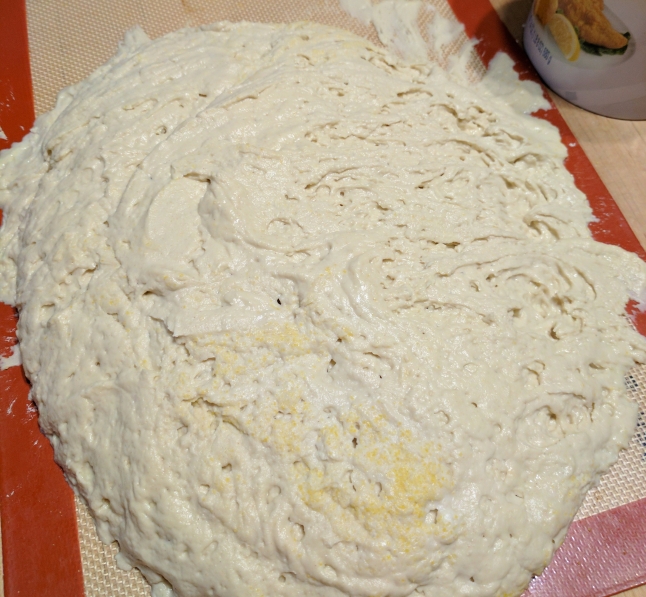
    As you can see, the bread dough tried to escape the boundaries of its silicon baking mat. It steadfastly refused to create a nice ball.

  6. Let the loaf warm to room temperature and rise again. Keep in mind the temperature of your kitchen will make a difference in how quickly the dough rises. It could take up to 3 hours, but you’ll want a least 90 minutes total.
  7. A half hour to 45 minutes before you want your bread, place a cast-iron dutch oven (including the lid) into to preheat at 450 F.
  8. In 30 minutes, remove the now hot pot from the oven, and lightly coat it with non-stick spray and sprinkle in some cornmeal. (It might smoke a bit so not too much oil.
  9. Turn the risen dough into the pot and shake gently to try to make it settle evenly. You can make a few slashes in the top.  Then place the lid on and slide it into the oven.

    GF bread dough in the dutch oven.

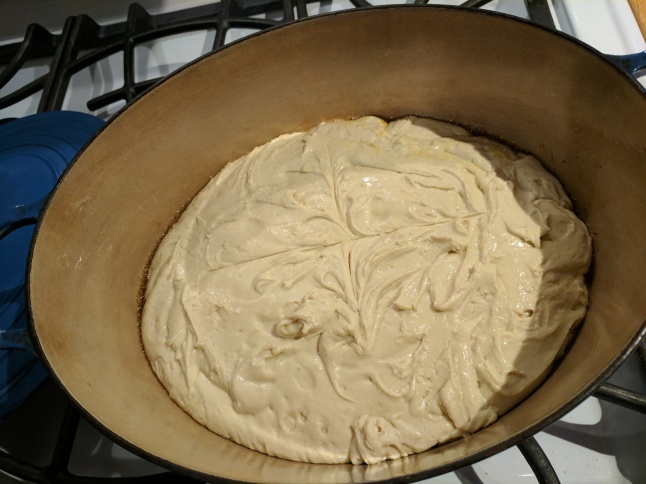
    Dough – pre baking in the super toasty dutch oven.

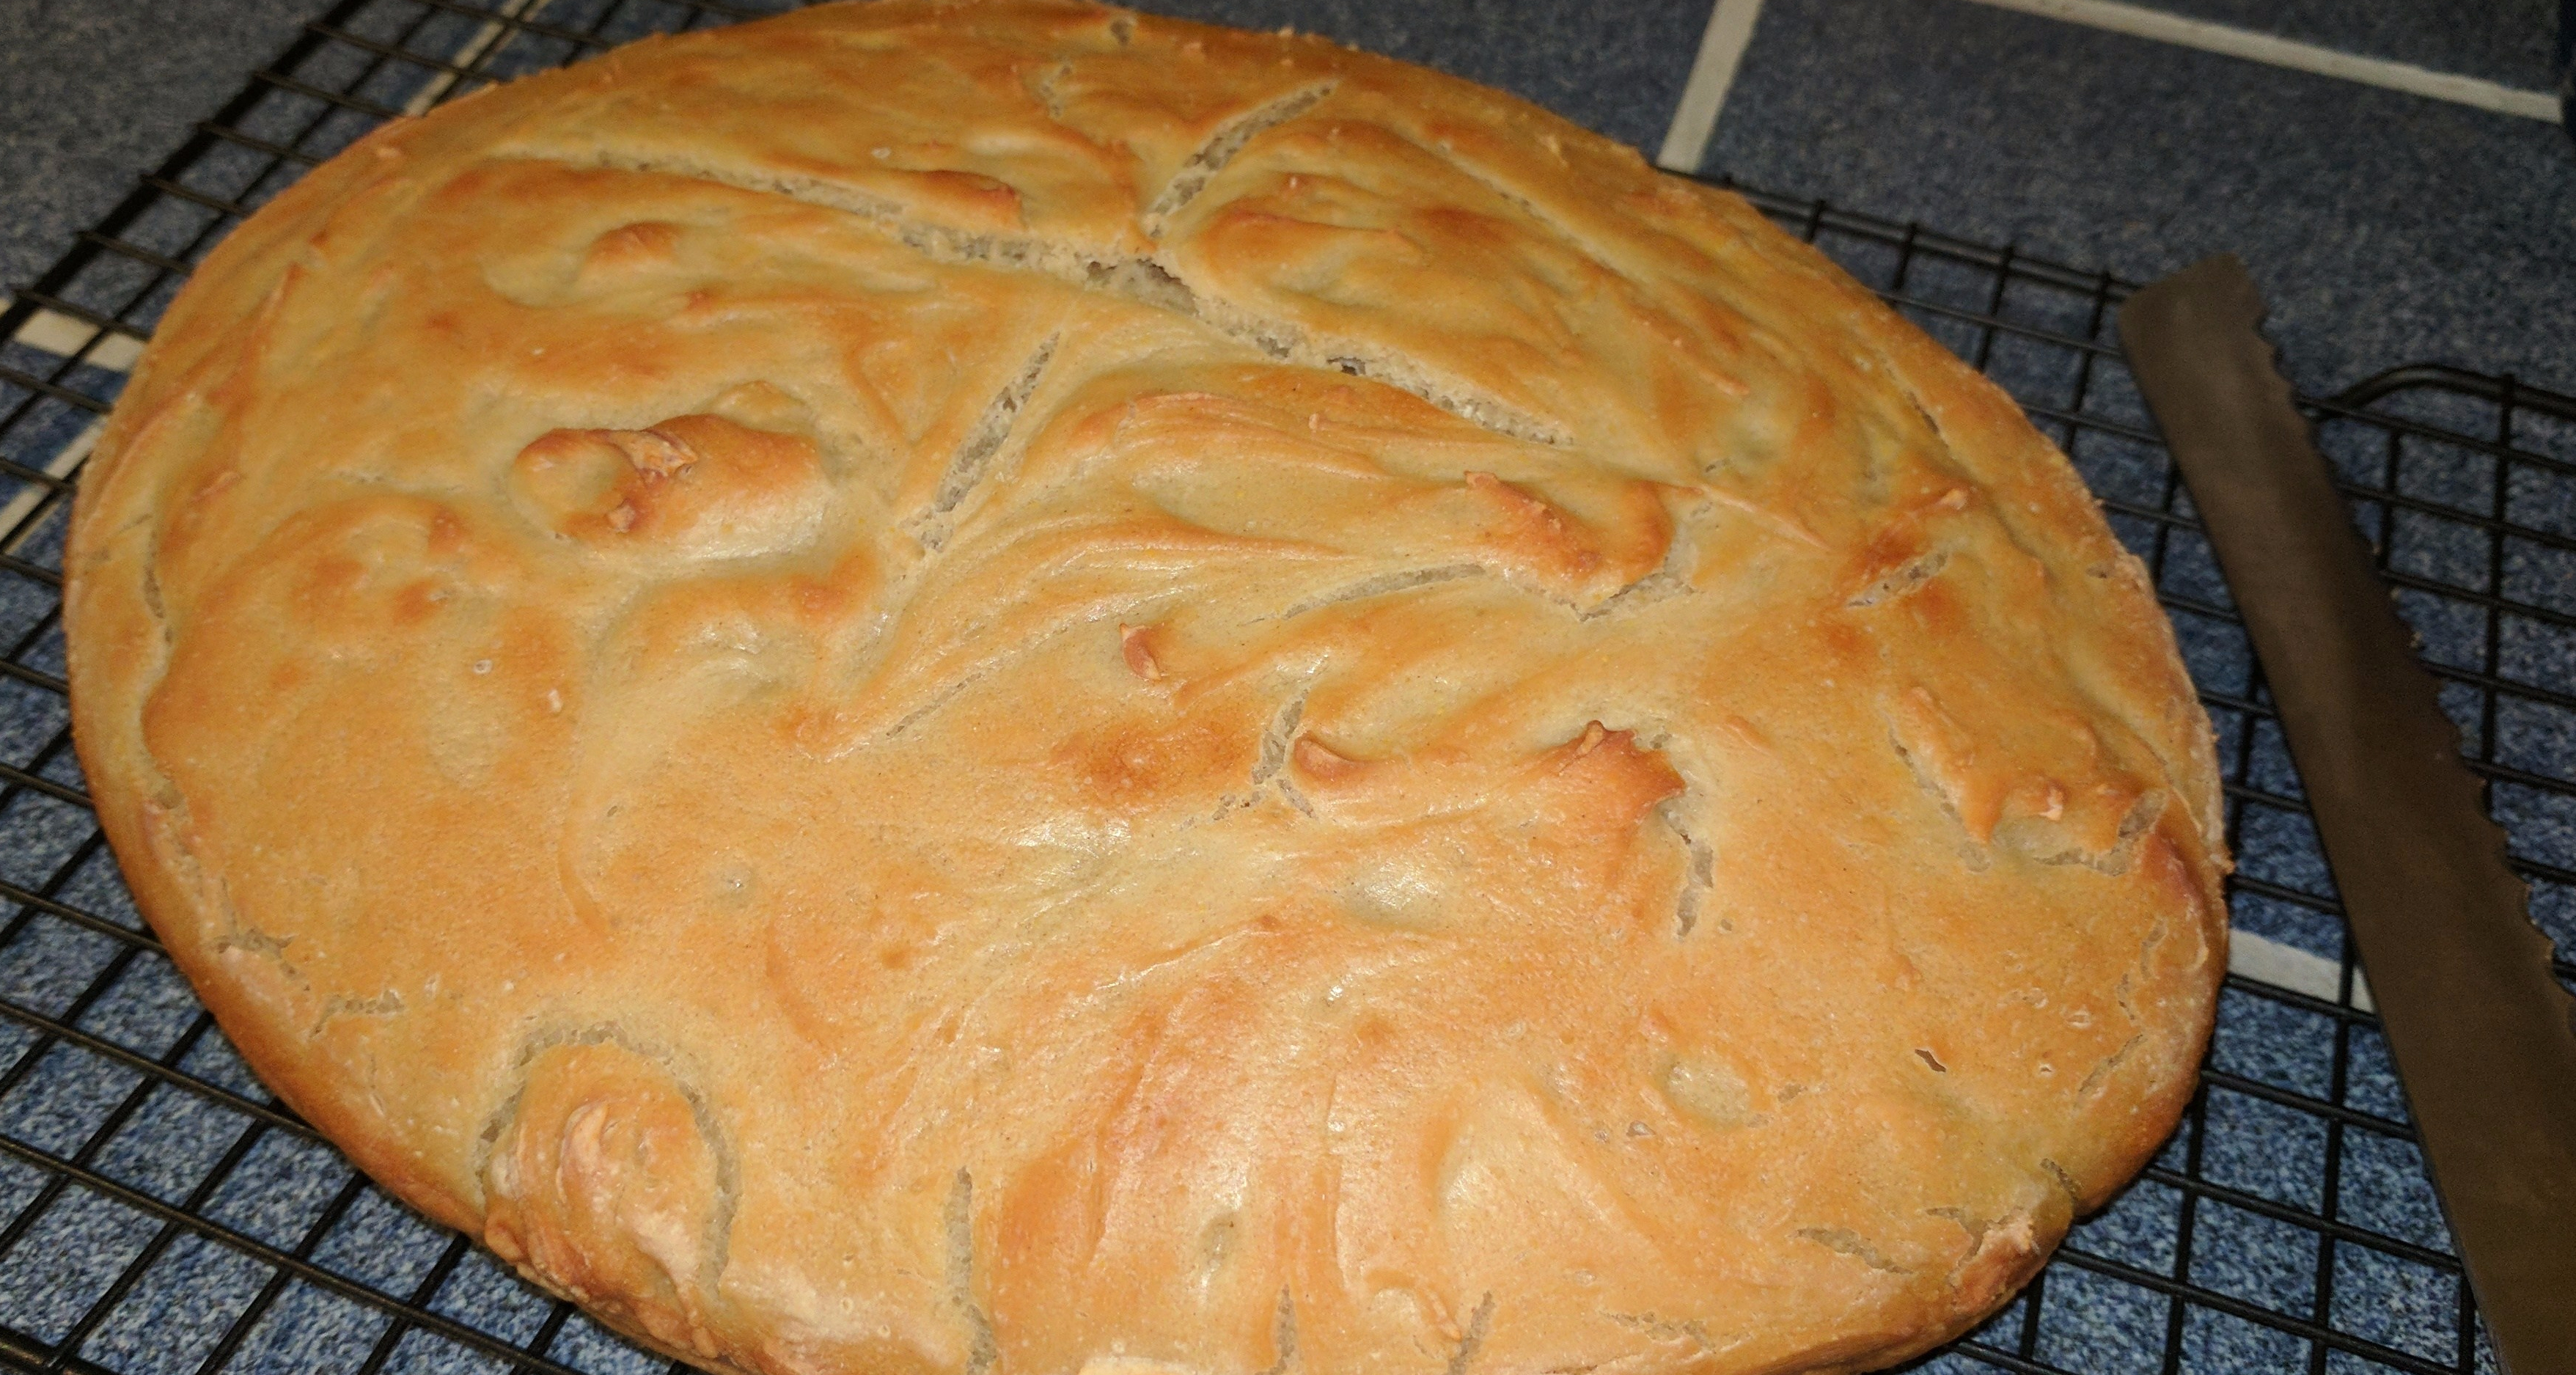
  1. Bake for 30 minutes with the lid on, and then remove the lid and cook for another 5 or 10 minutes until the loaf browns up.
  2. Remove the loaf from the oven and let cool as long as you can stand before slicing it to eat.  Let it cool completely on a rack before putting it in a bag or cover it, otherwise the steam will still be coming out and it will make your leftover bread lose its nice crispy crust.

The bread came out with a beautiful, crispy flaky crust, even if it was so flat it looked more like a ciabatta than a boule or loaf.  The texture was quite dense, and not as light as I wanted, but still very flavorful and not soggy. In the words of hubby, this is the first GF bread he has ever had with a crispy crust.

GF Bread cooked in a Dutch OvenLessons learned:

Crispy is good.  That part worked perfectly.  However, the bread needed to rise more, so alterations are in order.  It’s definitely worth trying again. My lessons learned are below.

Next time I will:

  • Use newer and slightly more yeast than the non-GF recipe called for.  (My yeast hadn’t expired but it was only about a week from it.  If there hadn’t been a foot of snow in the driveway, I probably would have gotten some new.)
  • Use only the egg white and see if that makes a difference.
  • Use slightly less liquid — The dough was quite floppy and couldn’t support its own weight, which meant it was too wide and not tall enough.
  • Possibly go with slightly less heavy flour — I’m kind of torn on this. Heavier GF flours (bean, buckwheat, etc. ) tend to have more flavor than lighter ones (starches, white rice).  After all you want bread worth eating when you get done. I might try adding a bit of cornmeal as well.
  • Sift the flour beforehand and see if I can add more air before starting
  • Let it rise for longer, both initially on the counter and especially in the fridge.
  • See if I can find a slightly smaller dutch oven to force a taller loaf.
  • Brush some rosemary oil and garlic over the top for added flavor.
snow day meal

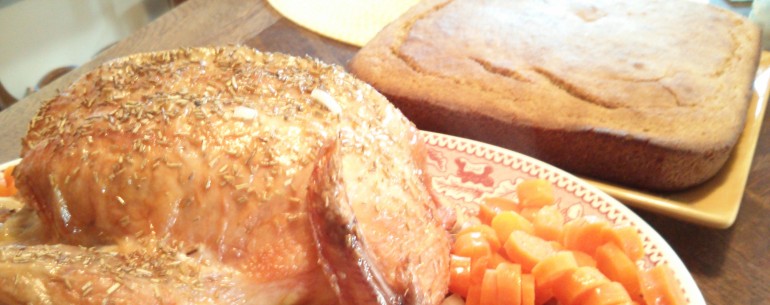
Served with bake potato, corned beef and carrots. Not exactly health food, but very tasty and filling on a cold day


Canyon Bakehouse Hamburger Buns

Canyon Bakehouse Hamburger Buns Review

Canyon Bakehouse Hamburger BunsCanyon Bakehouse Gluten Free Hamburger Buns are a new product at one of my local grocery stores (Stop&Shop/Giant).  You can also buy them direct from Canyon.  Hubby is a big fan of the taste and texture of these over a bunch of other buns we have tried. They are light-brown, unsurprising given that Brown Rice Flour is the top ingredient (also features Tapioca, Sorghum, Millet and Potato), have a texture close to that of wheat bread, and more taste than a lot of gluten-free products.

They are certified GF. They are also dairy, nut and soy free as well, if those are issues for you (but do contain eggs).

The only downside seems to be that they can get a bit squished in the freezing process (or more likely transfer), so it was hard to cut one or two of them and use them for an actual hamburger because the bottom was mangled up.  But a definite thumbs up. They are now a repeat buy.

Gluten-Free Raspberry Oatmeal Coconut Bars

Both hubby and I are tea drinkers, and were delighted to discover a tea shop in Brattleboro, VT, where we go every few years for the annual Strolling of the Heifers, a major dairy and slow food festival that’s held on the first Saturday of June.  We stumbled onto a placed called the Twilight Tea Lounge (now closed, sadly) that had  hundreds of tea options and most importantly for hubby, GF options. He was thrilled the first time we were there to eat a yummy raspberry bar.

This is something I created based on those bars.

Raspberry Coconut Oatmeal bars Ingredients

For the bottom

  • 1 1/2 c. GF baking mix (I used Bob’s 1-to-1)
  • 1 1/2 c. oatmeal (preferably coarse ground Irish or regular, not quick)
  • 1/2 c softened butter
  • 1 egg, beaten
  • 2/3 c brown sugar
  • 1/8 granulated sugar
  • Dash of salt

For the top

  • 3/4 c toasted coconut flakes
  • 1/2 c GF flour/baking mix
  • 3/4 c oatmeal
  • 1/3 c. brown sugar
  • 3-4 tbsps softened butter

In the center

  • 1 1/2 c. raspberry preserves or jam

IMG_20150722_161538

Toast the coconut lightly.   Meanwhile combine the dry ingredients for the bottom in a large mixing bowl , and mix –  add the egg and the melted butter and mix until moistened.

Press the mixture into the bottom of a 13×9 pan.  Place in a 350 F oven for 10 minutes until it browns a bit on the top.

Remove and cover with the jam or preserves.  Raspberry Coconut Oatmeal Bars

Mix together the remaining ingredients, dry ingredients first and sprinkle over the top.  Place in oven and cook for an additional 20-25 minutes until golden brown on the top and the jelly is bubbling.

Raspberry Preserves

IMG_20150722_173610
You can use jam or make your own if you can get some fresh raspberries.  Since mid-July is primo berry season, I decided to try my hand at making my own.

  • 2 -4 cups Raspberries, washed and either chopped or put through a food mill.
  • 1-2 c sugar
  • 2-3 tbsps of lemon juice
  • bit of salt
  • 1/3 c of water

Put the berries in a pot over medium – high heat.  Add the water, sugar, and lemon juice and cook until it starts to thicken.  If you want it very thick, you can add cornstartch (dissolve it first or you’ll get lumps) or pectin, which is trickier to use.

This should take about 5 minutes.  When it stops dripping off the spoon and is thick enough to coat the back, it’s done.

Don’t let it boil too high or it will scorch the sugar.

Note: if you get too much water, it will be too runny, but never fear, you can always put in a bit of corn starch dissolved in warm water to thicken it. Make sure it boils after you add the corn starch or it won’t do its job.

You can try to remove some of the seed with the mill afterwards but they don’t bother me so I just leave them in.

Gluten Free Heaven – Against the Grain Factory Store

Exterior of the Against the Grain Factory Store in Brattleboro, VT

Against the Grain Factory Store

It has been over 90 degrees here the last few days, which makes me a little reluctant to spend a lot of time in the kitchen. (Like most New England homes, especially ones that are 125 years old, ours does not have built-in AC. Even with window units, it’s still pretty toasty.)

Instead I’m posting about a fun GF-related outing we just had. Hubby and I just spent a lovely weekend in Vermont. We were planning on doing some hiking and kayaking, but ended up having a lot more sedate trip because I fell and broke a rib last weekend. (Ouch!) So definitely NO kayaking, and sadly for Hubby, not even much fun driving the little back roads as we might as otherwise had since my bruised ribs and the car seat were not getting along very well.

Our first stop in Vermont was the Against the Grain factory store, which is located in their production facility in Brattleboro, Vermont.  If you are not familiar with Against the Grain products, they are really good, especially the GF French baguettes.  We’ve met the owner briefly a couple of times now at another Vermont event, the Strolling of the Heifers. Unfortunately, they don’t have a factory tour, (hint, hint) but they do have free and discounted ATG items, and given the price of gluten-free foods, it was well worth it.  They also have samples, cookbooks and some GF merchandise (including their tongue-in-cheek “#gfyourself” t-shirts.)  The GF, Vegan cookies were excellent. (I’m a big dairy fan, and usually not so into the vegan, so if I say something vegan is good, it’s pretty good).

We could only buy what we could eat in the next few days, since we didn’t have access to a freezer.  But we did get some super yummy rolls and baguettes. No, the texture and taste of an Against the Grain baguette is not quite the same as a “real” wheat baguette, but believe me, if you haven’t had one, they are worth getting.  It is both by light years the closest we have found, but also stands on its own.  It doesn’t need to compete to be “real.”  This is one of the products that passes the test of – I eat because I want to, since I don’t have to eat GF. They just had the plain baguettes as seconds, which is yummy, although the rosemary version is even better, I think.

Nancy Cain, the founder, doesn’t like using gums as binders and so for this bread basically uses cheese as the binder. Generally ATG products use lighter flours (tapioca, etc.) The result is a loaf that is light (yes, a gluten-free product that is light without being tasteless!) and airy, has a good chew factor (not as crunchy as with wheat), and is very tasty.  It’s sort of like a cross between standard French bread and a cream puff shell. Along with tasting good, the company tries to do good with its business practices, using as much green energy as possible and paying a starting wage of $15 a hour for all workers. She has a new cookbook out, which I bought and will be trying recipes from so you will hear a lot more about that.

Picnic Spot under the Dummerston Covered Bridge

Is this a gorgeous picnic spot or what?

We had brought ham, cheese, tomatoes, berries and drinks with us.  Now with the bread, we had all the elements for a spectacular picnic.  We ate along the West River in Dummerston, just under one of Vermont’s many covered bridges. I gingerly descended the steps to the river and we were definitely rewarded for the effort because it was a gorgeous spot and we had a wonderful picnic, watching the rapids and little kids (and some grownups) jump around in the water.

PS. If you do go to Against the Grain, the store is quite hard to find, so don’t give up.  You turn in from Rt. 5 just before the Agway.  There’s a set of industrial buildings just to the back of it, and you need to go in there and follow around the edge of the building all the way to the other side.  (There is a very, very tiny sign). Alternatively, you can go around the front of the Agway and back around on that side.

Roast chicken on bed of rice and sausage

Gluten-Free Cornbread

For this cornbread I use a mixture of flours.  For gluten-free baking, it can be difficult to get the right flour mixture.  I do recommend Bob’s Redmill flours. I used Bob’s 1 to 1 mix, plus a little fava bean and some buckwheat (which despite its name contains no wheat and no gluten).

When choosing flours, you can either choose a flour and add xantham or guar gum, which add the stretchy bit that is usually contributed by gluten, or choose a baking mix, which generally includes gum already.  You can skip the xantham gum, which is kind of bitter and smelly, but just be aware that whatever you’re making will be a little more crumbly.  You can address some of this with a bit more liquid or fat, and can more easily get away without it in heavier foods (think pound cake) than lighter ones (think biscuit).

Ingredients

  • 1 cup GF baking mix or flour
  • 1 cup yellow cornmeal
  • 1/4 cup sugar
  • 1 tbsp baking powder
  • 1/2 tsp salt
  • 1/4 cup vegetable oil
  • 1 tbsp butter, melted
  • 1 egg, beaten until fluffy (you can also use 2 egg whites)

Preheat oven to 400 degrees F. (205 C)

Grease and flour a 8×8 or 9×9 inch glass pan.  If you like you can add a piece of waxed paper, which makes removal a lot easier.

Mix dry ingredients. Stir in the milk, eggs, oil and butter, until just moistened.  Pour into pan.  Bake 20-25 minutes until lightly browned on top, it springs back when lightly touched and a toothpick inserted in the center comes out clean.