Vegetable Pallao and Cumin Cashew Chicken

Pullao Rice with Peas

I was looking for an accompaniment to Cumin and Cashew Chicken, and pulled this from my trusty Curries without Worries cookbook by Sudha Koul. (Out of print,Vegetable Pallao and Cumin Cashew Chicken 
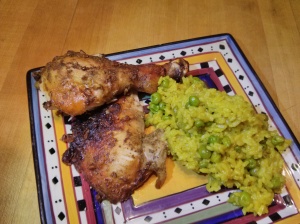
but you can get it used.)  She introduces basic Indian cooking for not so savvy Americans (which I definitely was when I bought it over 20 years ago).  It did call for a lot of spices, many of which I didn’t have on hand. In the interest of speed and the contents of my spice rack, I adapted a number of ingredients to use ground rather than whole spices (cinnamon, cumin, the ginger, etc.)

Ingredients

  • 1 small to medium onion, finely chopped
  • 2 tbsps olive
    oil
  • 2 tbsps butter or ghee
  • 1/2 tsp ground ginger or 1 tsp fresh finely chopped ginger
  • 1/2 tsp ground turmeric
  • 1/2 tsp cinnamon (or a cinnamon stick)
  • 1/2 tsp ground cumin or cumin seeds
  • 1/4 tsp ground cloves or you can use 3 whole cloves
  • 1/4 tsp cardamon or 2 cardamon pods, crushed
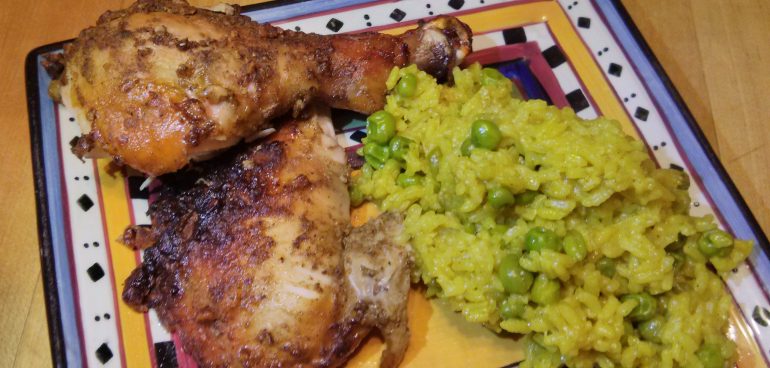
  • 12 ounces peas (I used frozen).  You can also add another cup or so of veggies like cauliflower or potato. They should be crunchy and cut fairly small.  All I had on hand was peas, so that’s all I used this time.
  • 1 cup basmati rice
  • 1 cup chicken stock (if you want vegetarian than just use water)
  • 1 1/2 cups water
  • You can also add a pinch of saffron, soaked in 5 tbsps of water.

Instructions

Heat the oil and butter in a heavy saucepan on high for a minute until melted, then add the onion, ginger and turmeric and fry for another minute, stirring constantly.  Add the remaining spices except the salt, stirring them into the mixture for a few seconds. Add your vegetables and stir fry for 2 minutes. Add the dry rice and stir fry again for a few moments to really mix the spices onto the rice.

Add the stock, water and salt to the mixture and stir until boiling. Reduce the heat to low, add the saffron  if you have it, cover and cook for 15 minutes. The vegetables will start to float but don’t stir unless absolutely necessary as it breaks the rice grains and makes them lumpy. (which is why you want a heavier pot and low heat). Toss with a fork just before serving. Taste and add any additional salt to taste.

I served it with Cumin and Cashew Chicken. Hubby loved it.  Thumbs up.

White White and Sherry Pasta Sauce

White Wine & Sherry Pasta Sauce

White White and Sherry Pasta SauceI often make a quick pasta sauce by throwing together shallots, garlic, a few spices and some white wine. I use fresh herbs when I can, but often use dried as well.  It usually cooks for only as long as it takes to boil the water and cook the pasta. Other ingredients go in as I have time, inclination or can find in the fridge.  This typically includes things such as sun-dried tomatoes, mushrooms and chopped spinach. (I’m a stealth vegetable eater.  I don’t like many vegetables so I try to sneak them into sauces and such to up my intake.)  This version include fresh herbs from the garden, mushrooms and tomatoes, as well as the addition of sherry.  I sometimes add diced chicken and sub chicken stock for the white wine. This makes enough for one or two.

Ingredients

  • 1/2-1 shallot or (or 2 tsps dried)
  • 3-4 cloves garlic
  • 1-2 tbsp olive oil
  • 3-5 sun-dried tomatoes
  • 3-4 small button or baby bella mushrooms
  • 1/4 cup dry sherry
  • 1/2 cup white wine
  • Herbs (I used fresh oregano, basil and rosemary, about 1 tablespoon each of chopped oregano and basil and a spring of rosemary).  If you are using dried, frankly I usually eyeball it.  4-5 good shakes of Italian herbs, plus an extra shake or two of basil, oregano and rosemary).
  • 2-3 tbsps butter
  • 1-2 tbsps Parmesan cheese (to mix in; you’ll want extra to top the sauce when it’s done).
  • 1/2-1 c  pasta per serving (Hubby eats gluten-free – his favorite is Tinkyada – the shells are pictured above. I go with regular since it’s so much cheaper than GF pasta and we eat a lot of pasta).

Instructions

Cook the pasta according to directions.

While the pasta is cooking (start when you put the water on), peel and finely chop the garlic and onion. Saute them in olive oil on low heat.  Dice and add the sun-dried tomatoes and mushrooms).  If you are using dried herbs, add them now. Cook, stirring occasionally until the shallot is translucent, and the mushrooms have browned.

Sauce after sauteing the base and adding wine and sherry

Adding butter to the reduced sauce

Add the wine and sherry and simmer to reduce and burn off the alcohol.

If you are adding spinach or fresh herbs, add them once the sauce is reduced a bit. (Otherwise they lose a lot of their color). It will generally cook down to the right level in the time it takes to boil water and cook pasta. If you get distracted and it gets a bit dry, just add some more wine or sherry.

Just before serving, add 2-3 pats of butter and stir to melt in. This thickens the sauce (without gluten!).  Once the butter is melted, add the Parmesan cheese and do the same thing. You can add a bit more butter if it seems too thin.

Serve over pasta, with additional Parmesan as a garnish.

Glass of Red Wine on the counterEnjoy!  (The joy of using the sherry is that it gives the sauce a deeper flavor and you can go with either red or white wine depending on your mood.)

What will you try adding?

Canyon Bakehouse Hamburger Buns

Canyon Bakehouse Hamburger Buns Review

Canyon Bakehouse Hamburger BunsCanyon Bakehouse Gluten Free Hamburger Buns are a new product at one of my local grocery stores (Stop&Shop/Giant).  You can also buy them direct from Canyon.  Hubby is a big fan of the taste and texture of these over a bunch of other buns we have tried. They are light-brown, unsurprising given that Brown Rice Flour is the top ingredient (also features Tapioca, Sorghum, Millet and Potato), have a texture close to that of wheat bread, and more taste than a lot of gluten-free products.

They are certified GF. They are also dairy, nut and soy free as well, if those are issues for you (but do contain eggs).

The only downside seems to be that they can get a bit squished in the freezing process (or more likely transfer), so it was hard to cut one or two of them and use them for an actual hamburger because the bottom was mangled up.  But a definite thumbs up. They are now a repeat buy.

Gluten-Free Pulled Pork

Dry-Rubbed Pulled Pork and Barbecue Sauce

I love love love pulled pork, but don’t have a real BBQ pit in the yard.  Instead, I take a shortcut of popping my pork in a crockpot, which still gets you a slow-cooked, braised pork without a lot of mess.

Dry Rub ingredients

  • 1/4 c. brown sugar, loosely packed
  • 2 tbsp chili powder
  • 1 tbsp cumin
  • 1 tbsp paprika
  • 2 tsp ground pepper
  • 1 tsp cayenne pepper
  • 1 tsp dry mustard
  • 1 tsp salt

Mix the ingredients together.  Trim off most of the excess fat from a pork shoulder roast (I used a Boston butt that was just over 4 lbs).  Place the rub on the top of the roast and sides, then flip over and place the rest on bottom of the roast. Ideally it is best to place the rub on the roast the night before you cook it.

The next morning place the roast in a large crockpot.  Pour 1/4 cup white or apple cider vinegar and 1/2 of dry ginger ale into the crock pot.  Cook on high for one hour and then turn down to low and cook for at least 4-5 more hours, depending on the size of the meat.  Because it is in a crock pot, and tends to be fairly fatty cut of meat, you can let it go a fair amount before it will become dry.

The meat is done when it flakes off when touched with a fork.

Gluten-Free Pulled PorkRemove the meat from the crock pot and let rest for 20 minutes.  Then pull the meat into shreds with two forks.

You can serve on a GF bun or with mac and cheese, cole slaw or other traditional BBQ accompaniments, including, of course, BBQ sauce.

Pulled Porked BBQ with Gluten-Free Macaroni and Cheese

Pulled Pork BBQ with Gluten-Free Macaroni and Cheese

As an experiment.  I made a Memphis style, whereas last time I made a mustard sauce.  It was good, but not quite what I wanted. If you’re buying, Pork Barrel makes a nice smoky BBQ that’s GF, or I also like Sweet Baby Ray’s.

gluten-free Memphis style barbecue sauce

Memphis Style BBQ Sauce

gluten-free Memphis style barbecue sauceBBQ and other sauces can often be “stealth” sources of gluten, so if you make your own, you can be assured it’s gluten-free.  Plus this is delicious.

This makes about 3 cups, more than enough for your average pulled pork shoulder and some extra besides.  It will keep for several weeks in the fridge or longer if you bottle it and store it properly.

This is adapted from Steven Raichlen’s Barbecue! Bible Sauces Rubs and Marinades book.  It’s a great book that gives you background on the way the ingredients in BBQ sauces and rubs work.  I highly recommend it.

With the meat, this sauce has just about the right amount of kick, and will mellow out a bit as it cools than when you first put it together.

Wet Ingredients

  • 2 cups tomato sauce
  • 1/2 c. apple cider vinegar
  • 1/2 c. Pepsi or other cola
  • 2 tbsp yellow or brown mustard
  • 2 tbsp lemon juice (1 average lemon should do it)
  • 2 tbsp Worcestershire Sauce
  • 2 tbsp teriyaki sauce (Note that teriyaki and soy sauce can be a hidden source of gluten, so make sure yours is GF by checking the allergen/ingredient list or make sure it’s labeled GF. (Kikoman now makes a GF Teriyaki and La Choy has a GF soy sauce).
  • 1 1/2 tbsp soy sauce (ditto as above for the teriyaki on the stealth gluten)
  • 1 tbsp molasses
  • 1/2 tsp Tabasco sauce
  • 1/4 tsp liquid smoke (optional)

Dry Ingredients

  • 1/4 c. brown sugar, loosely packed
  • 1 tbsp chili powder
  • 1/2 tbsp ground black pepper
  • 1/2 tbsp dry mustard
  • 1/2 tbsp paprika
  • 1 1/2 tsp garlic powder
  • 1/2 tsp dried onion or shallot
  • 1/4 tsp cayenne pepper
  • 1/8 tsp celery seed
  • 1/8 tsp salt (optional)

Note: I did not add much salt as almost all of the sauce ingredients already have a fair amount of sodium by their nature.

Directions:

Gluten-Free Memphis BBQ sauce on the stove

Ancient Le Creuset to the rescue

Mix the dry ingredients together.

Place the wet ingredients in a stainless steel or enamel pan (I used my Le Creuset saucepan that I inherited from my mother-in-law, who got it as a wedding gift so it’s older than I am.  It has a lovely pour spout that is very convenient for pouring the sauce after cooking.)  Bring the liquid ingredients to a boil over medium high heat.  Stir for a minute or so and then add the dry ingredients and mix.  Simmer over low heat for 20-30 minutes until the sauce thickens up and is reduced by a quarter or so.   Let cool, pour into containers for serving and storage. It will keep in the refrigerator for several weeks at least. IMG_20150726_125143

I served it with pulled pork. You can dip or just throw some on and mix it up.  Super yum!

Gluten-Free Raspberry Oatmeal Coconut Bars

Both hubby and I are tea drinkers, and were delighted to discover a tea shop in Brattleboro, VT, where we go every few years for the annual Strolling of the Heifers, a major dairy and slow food festival that’s held on the first Saturday of June.  We stumbled onto a placed called the Twilight Tea Lounge (now closed, sadly) that had  hundreds of tea options and most importantly for hubby, GF options. He was thrilled the first time we were there to eat a yummy raspberry bar.

This is something I created based on those bars.

Raspberry Coconut Oatmeal bars Ingredients

For the bottom

  • 1 1/2 c. GF baking mix (I used Bob’s 1-to-1)
  • 1 1/2 c. oatmeal (preferably coarse ground Irish or regular, not quick)
  • 1/2 c softened butter
  • 1 egg, beaten
  • 2/3 c brown sugar
  • 1/8 granulated sugar
  • Dash of salt

For the top

  • 3/4 c toasted coconut flakes
  • 1/2 c GF flour/baking mix
  • 3/4 c oatmeal
  • 1/3 c. brown sugar
  • 3-4 tbsps softened butter

In the center

  • 1 1/2 c. raspberry preserves or jam

IMG_20150722_161538

Toast the coconut lightly.   Meanwhile combine the dry ingredients for the bottom in a large mixing bowl , and mix –  add the egg and the melted butter and mix until moistened.

Press the mixture into the bottom of a 13×9 pan.  Place in a 350 F oven for 10 minutes until it browns a bit on the top.

Remove and cover with the jam or preserves.  Raspberry Coconut Oatmeal Bars

Mix together the remaining ingredients, dry ingredients first and sprinkle over the top.  Place in oven and cook for an additional 20-25 minutes until golden brown on the top and the jelly is bubbling.

Raspberry Preserves

IMG_20150722_173610
You can use jam or make your own if you can get some fresh raspberries.  Since mid-July is primo berry season, I decided to try my hand at making my own.

  • 2 -4 cups Raspberries, washed and either chopped or put through a food mill.
  • 1-2 c sugar
  • 2-3 tbsps of lemon juice
  • bit of salt
  • 1/3 c of water

Put the berries in a pot over medium – high heat.  Add the water, sugar, and lemon juice and cook until it starts to thicken.  If you want it very thick, you can add cornstartch (dissolve it first or you’ll get lumps) or pectin, which is trickier to use.

This should take about 5 minutes.  When it stops dripping off the spoon and is thick enough to coat the back, it’s done.

Don’t let it boil too high or it will scorch the sugar.

Note: if you get too much water, it will be too runny, but never fear, you can always put in a bit of corn starch dissolved in warm water to thicken it. Make sure it boils after you add the corn starch or it won’t do its job.

You can try to remove some of the seed with the mill afterwards but they don’t bother me so I just leave them in.

Gluten Free Heaven – Against the Grain Factory Store

Exterior of the Against the Grain Factory Store in Brattleboro, VT

Against the Grain Factory Store

It has been over 90 degrees here the last few days, which makes me a little reluctant to spend a lot of time in the kitchen. (Like most New England homes, especially ones that are 125 years old, ours does not have built-in AC. Even with window units, it’s still pretty toasty.)

Instead I’m posting about a fun GF-related outing we just had. Hubby and I just spent a lovely weekend in Vermont. We were planning on doing some hiking and kayaking, but ended up having a lot more sedate trip because I fell and broke a rib last weekend. (Ouch!) So definitely NO kayaking, and sadly for Hubby, not even much fun driving the little back roads as we might as otherwise had since my bruised ribs and the car seat were not getting along very well.

Our first stop in Vermont was the Against the Grain factory store, which is located in their production facility in Brattleboro, Vermont.  If you are not familiar with Against the Grain products, they are really good, especially the GF French baguettes.  We’ve met the owner briefly a couple of times now at another Vermont event, the Strolling of the Heifers. Unfortunately, they don’t have a factory tour, (hint, hint) but they do have free and discounted ATG items, and given the price of gluten-free foods, it was well worth it.  They also have samples, cookbooks and some GF merchandise (including their tongue-in-cheek “#gfyourself” t-shirts.)  The GF, Vegan cookies were excellent. (I’m a big dairy fan, and usually not so into the vegan, so if I say something vegan is good, it’s pretty good).

We could only buy what we could eat in the next few days, since we didn’t have access to a freezer.  But we did get some super yummy rolls and baguettes. No, the texture and taste of an Against the Grain baguette is not quite the same as a “real” wheat baguette, but believe me, if you haven’t had one, they are worth getting.  It is both by light years the closest we have found, but also stands on its own.  It doesn’t need to compete to be “real.”  This is one of the products that passes the test of – I eat because I want to, since I don’t have to eat GF. They just had the plain baguettes as seconds, which is yummy, although the rosemary version is even better, I think.

Nancy Cain, the founder, doesn’t like using gums as binders and so for this bread basically uses cheese as the binder. Generally ATG products use lighter flours (tapioca, etc.) The result is a loaf that is light (yes, a gluten-free product that is light without being tasteless!) and airy, has a good chew factor (not as crunchy as with wheat), and is very tasty.  It’s sort of like a cross between standard French bread and a cream puff shell. Along with tasting good, the company tries to do good with its business practices, using as much green energy as possible and paying a starting wage of $15 a hour for all workers. She has a new cookbook out, which I bought and will be trying recipes from so you will hear a lot more about that.

Picnic Spot under the Dummerston Covered Bridge

Is this a gorgeous picnic spot or what?

We had brought ham, cheese, tomatoes, berries and drinks with us.  Now with the bread, we had all the elements for a spectacular picnic.  We ate along the West River in Dummerston, just under one of Vermont’s many covered bridges. I gingerly descended the steps to the river and we were definitely rewarded for the effort because it was a gorgeous spot and we had a wonderful picnic, watching the rapids and little kids (and some grownups) jump around in the water.

PS. If you do go to Against the Grain, the store is quite hard to find, so don’t give up.  You turn in from Rt. 5 just before the Agway.  There’s a set of industrial buildings just to the back of it, and you need to go in there and follow around the edge of the building all the way to the other side.  (There is a very, very tiny sign). Alternatively, you can go around the front of the Agway and back around on that side.

Link

Designing with food, or Gretchen Roehrs rocks.

imageSometimes I think I am a creative person and then I see stuff like this and realize I have only scratched the surface.

Fashion Designer Gretchen Roehrs dresses up her sketches with actual fruit and vegetables. Some seem to be pure food imagination and others imitations of “real” dresses and coats.

They are utterly fantastic.

.Designer Gretchen Roehrs and food dressesDesigner Gretchen Roehrs uses oranges to spoof this coat.

YoBrussels sprout illustration by Gretchen roehrsu  can read more about her and these fantastic food fashions on Bored Panda. You can also follow her on instagram (groehrs)

Who knew Brussels sprouts could look so good?